Login | Register Cart (0)

Easier Veggie Flax Seed Crackers

By Healthy Planet Blog Nutrition and Natural Health
on July 20, 2012

Easier Veggie Flax Seed Crackers


Our favorite morning "energy" juicing recipe is just a matter of throwing in a few beets, carrots, celery stalks, and sometimes a low-sugar apple such as Granny Smith. We add 1/2 half of a raw lemon sometimes. I recently made our juice for the morning - without the apple - and looked at the stack of pulp that was left. We often just stir that into the dog's food dishes and they surprisingly really like it. For some reason that morning I started considering how I could use that pulp in some raw flax seed crackers. I decided to add ground flax seed, whole flax seed, some fresh minced garlic and some fresh chopped onions, plus some seasoning. By "raw", I mean using the dehydrator at around 105 to 110 degrees rather than baking them. I ended up doing both - one batch dehydrated and one batch baked at 350 degrees for about 2 hours. 

Following those successful batches, I then decided rather than juicing the vegetables why not just put them through the food processor. So I did just that and added walnuts and sunflower seeds - a good choice and certainly enhanced the flavor and feel of the cracker. I baked half and dehydrated half. The nutrition is obviously higher in the dehydrated ones, but I do like the instant gratification (well 2 hours) over the 10 to 12 hours in the dehydrator. Very satisfying for us since we haven't had any bread or cracker products in quite some time.

For the last batch, I did use the food processor and for some reason baking them at 350 degrees for one hour ended up burning a large outside portion of the batch - big bummer. (See important note below - after subsequent batches, I found that 250 degrees worked much better. Bake 1 hour, score and turn the crackers over and bake for another 30 to 45 minutes until crispy.) I had put half of the batch in the dehydrator so we at least had those. I should have checked them rather than just setting the timer for one hour, but was busy outside. Lessons learned. I do suggest that since different combinations of vegetables can certainly be substituted as some people aren't as fond of beets as we are, or onions, that you blend the mixture, add the flax seeds, nuts, sunflower seeds and just enough oil to make it possible to spread onto a baking sheet or dehydrator sheet. I suppose if I were industrious enough I would do a You Tube video of this and perhaps will.

HOW TO BAKE FLAX SEED CRACKERS:

The first time I made them into cookie-sized rounds and smashed them down to about 1/2 inch. The next time I realized how wasteful of space this was and remembered some of my raw food cook books where they simply spread the entire batch over the entire baking sheet pressing it until it reaches the edges and assuring about 1/4 inch thickness. For the other ones, I did the same thing. On both I used the paraflex nonstick sheets. After one hour (or until the crackers feel done on one side), I scored them into cracker sizes with a sharp knife and turned them over on the dehydrator tray without the nonstick sheet to allow for additional drying. I turned the crackers over on the baked ones but left the nonstick sheet in the baking sheet. 

 
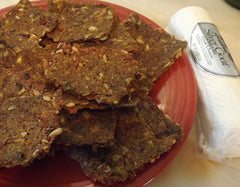
Yummy spread with soft goat cheese.

How long do I bake them?:

For the first batch, the one hour on one side and another hour on the 2nd side worked great in a 350 degree oven. (See note below - changed my recommendation to 250 degrees.)  I absolutely do not know why the last batch burned! The dehydrated ones, I dehydrated on one side for 4 hours, turned them over and dehydrated until they felt like crackers should - crunchy. Others may like them chewier, so this will require less time. 

INGREDIENTS: (organic where possible)

2 medium beets, peeled and cut into smaller pieces, the size depending on your food processor or juicer
1 medium onion, peeled and cut into smaller pieces, ditto above
5 stalks of medium sized celery, ditto above
5 medium sized carrots, peeled if using the food process, just scrubbed if using the juicer
1/2 of a medium red bell pepper
2/3 cups crushed flax seed (best to crush the whole seeds freshly each time in a coffee/herb grinder)
1/2 cup whole flax seeds
1/3 cup olive oil - or just enough to make the mixture stick together in order to spread
2 Tbsp Westporte Special Seasoning (or use your favorite all purpose seasoning)
5 to 6 twists of garlic salt seasoning
2 to 5 cloves of fresh garlic, minced
1/3 cup chopped raw organic walnuts
2/3 cups raw organic sunflower seeds

If you are from my generation, you might remember when Chef Boyardee came out with the pizza kits and our favorite things to do would be have pizza parties where we handmade the pizza's and added the toppings. Everything came in the box - you mixed the yeast with the dough and spread it evening onto a baking sheet. The point here is the same gently pressing and spreading the dough onto the sheet is much the same way I spread the cracker recipe over the entire baking sheets - evenly as possible and about 1/4 inch thick.

 For baking use 350 degree preheated oven (see note below) - and watch carefully for the 1st hour to make sure you don't make the same mistake I did. Score them into the size crackers you want and turn them over to bake for about another hour - or less. For the dehydrator ones, spread them onto the paraflex nonstick sheets for 4 hours. Test to see if they are ready to turn. If they are still too moist, dehydrate for another 2 hours. Test again and when ready, score them and turn them over onto a tray without the nonstick sheet. Dehydrate for about another 4 hours, testing as you go.

This is not nearly as complicated as it sounds! After your first batch you can tweak it as you would like, or be adventurous and tweak it from the start.

Note added: July 23, 2012: I made another batch today and changed the oven to 250 degrees. I watched them every 30 minutes and it took a little over an hour to bake the first side. I scored them and turned them over and they looked and tasted much better than the 350 degree oven batch. 

Follow this link to other ways to use the pulp leftover from juicing. Would really like to hear about your juicing recipes and any crackers that you make.

Thanks for listening!


Fresh Warm Spring Asparagus Salad

By Recipes for a Healthier You Vegetarian Entrees
on April 03, 2012

Warm Spring Asparagus Salad


Well, for our part of the country spring has come very, very early this year. Yesterday, April 2nd, the temperature on our deck was around 95 degrees! No - I'm definitely not complaining! I love spring and summer. One of the things I love about spring is the nice fresh asparagus that is so readily available. We planted it one year and it came back a couple of years, but never where it was big enough to pick. So, we depend on our local farmers. We've noticed too that Trader Joe's has a frozen asparagus which frankly is as good as any fresh I've tasted. We mostly just saute it in a little butter or olive oil, but when I saw this recipe for warm salad, I had to give it a try. The recipe came from George Matelian's daily email (from Whole Foods) we receive and it always has good information and recipes. To read more "in-depth" nutritional information and how to sign up for his newsletter - click here.


This one salad has an amazing array of healthy nutrients. Certainly, enough to give it a try. By using the frozen asparagus spears, you can save some time and effort. We'd use the raw apple cider vinegar and McKay's chicken seasoning. When our bell peppers are ready for picking this summer, we'll use those. In the meantime, we freeze them every year, so I have some and those are what I'll use in this recipe. I do always keep jars of roasted red peppers - maybe I will use those. The balsamic vinegar is a no-brainer for me - love the stuff.

The entire credit for the following goes to Whole Foods and their extremely informational website:

You can add this easy-to-prepare salad to your Healthiest Way of Eating in a matter of minutes. Not only is it an excellent source of health-promoting vitamins A, C, and E, but it provides 16% of your Daily Value for folate. Enjoy!

Prep and Cook Time: 15 minutes

Ingredients:

  • 1/2 small onion, cut in half and sliced thin
  • 2 TBS light vinegar (rice, apple cider, or white wine)
  • 1 cup hot water
  • 1 bunch asparagus
  • 3 TBS low-sodium chicken or vegetable broth
  • 7-1/2 oz jar of roasted red bell peppers, drained and slivered (or 2 medium red bell peppers, sliced thin)
  • 1 TBS balsamic vinegar
  • 1 TBS extra virgin olive oil
  • salt and black pepper to taste

Directions:
  1. Slice onion and place in a small bowl with vinegar and hot water while preparing rest of the ingredients.
  2. After about 10 minutes, remove onion from hot water and squeeze dry.
  3. While onions are marinating heat 3 TBS broth over medium heat in a stainless steel skillet.
  4. While broth is heating, snap off the woody bottom of asparagus stems, then cut the spears into 2-inch lengths. Cutting them into short pieces of equal length ensures quick, even cooking.
  5. When broth begins to steam, add asparagus. Cover and cook for 5 minutes. The outside will be tender and the inside will be crisp. Thinner spears will take about 3 minutes.
  6. Mix together roasted peppers with marinated onion, asparagus, vinegar, olive oil, salt, and pepper. Marinate for 4-5 minutes and serve warm.

    Optional: If you use fresh red bell peppers, Healthy Sauté them for 7 minutes and toss with rest of ingredients in place of roasted peppers. Serves 4


    Let us know if you try this! 

    Thanks for listening!


Beautiful Skin Cocktail

By Aromatherapy Recipes Naturally Nurturing Skin
on November 29, 2011
1 comment

Easy recipe for beautiful skin!


I love that some things are easy in life because so many aren't. This is one of those easy things and it really does make a difference in the look and feel of your skin. I know I have days when my skin looks vibrant and other days when it just looks drab (today for instance) - which is why I started reading one of the books on my shelves. I use the same facial regimen every day that I know to be effective and healthy, but sometimes you just have to start from the inside to achieve that healthy look. You need a juicer though - the kind with names like Champion that extracts the juice from the vegetable or fruit and expels the pulp. We got ours used for about $25.00 - just let people know you're looking for one. Or you can opt for a new one. I have an article somewhere that I wrote about which brands and types are available. Will have to find that.This recipe was adapted from Juicing, Fasting and Detoxing For Life by Cherie Calbom, MS.

BEAUTIFUL SKIN COCKTAIL

1 cucumber, peeled
1 parsnip, peeled
2 to 3 carrots, scrubbed well (peeled if not organic), tops removed
1/2 lemon, peeled
1/4 green bell pepper (Opt for the red if available, more vitamin C and phytonutrients, see below)

Cut fresh produce to fit your juicer's feet tube. Juice ingredients and stir gently to blend. Pour into a clear glass (I like to see the colors shining through) and drink as soon as possible. Precious vitamins and minerals are lost with each passing minute. Savor the taste - don't just gulp it down.  This should make 1 to 2 glasses.

Why this cocktail? 

Well, many reasons but I'll address mostly the benefits from bell peppers. However, carrots also contain a huge amount of carotenoids and vitamin A and contribute a great deal to healthy skin plus helping protect skin from UV damage. Below are other benefits from this particular juice:

1.  Silicon - cucumber, parsnip and bell pepper are good sources of the trace mineral silicon, which is recommended to strengthen skin, hair, and fingernails along with bones. In studies silicon has been shown to reduce signs of aging such as improving thickness of skin and reducing wrinkles. Silicon - not to be confused with silicone, refers to natural materials whereas silicone refers to man-made materials. Silicon is a nonmetallic element with the atomic weight of 28. Silicon increases absorption of calcium. As we age, silicon becomes depleted, so it can be an important addition to our diet as we age. There is no daily intake requirement but it is important that silicon be consumed on a daily basis.

2. Vitamins -  Bell pepper contains more than 30 different carotenoids. Carotenoids provide antioxidant and anti-inflammatory health benefits. Bell pepper is also an excellent source of vitamin C - two times the amount of vitamin C found in your typical orange. Red peppers have twice as much vitamin C as green ones. Go for the red! Every good Nebraskan knows that!! 

Bell pepper is also a good source of another antioxidant vitamin--vitamin E. German researchers report that the antioxidants vitamin E, selenium, and carotenoids - lutein, lycopene and beta-carotene - improve various aspects of skin health and reduce the effects of skin aging. "Subjects supplemented with the antioxidants in both groups also experienced a significant increase in skin density and thickness. In addition, roughness, scaling and wrinkling of the skin improved in both groups of subjects receiving the antioxidants." (1) 

Bell peppers contain a substantial amount of vitamin A with ripened red peppers having almost 16 times the amount of vitamin A than green bell peppers. According to WebMd, vitamin A is necessary for the maintenance and repair of skin tissue. "Without it you'll notice the difference." (2). Although being pharmaceutical-minded, they also recommend topical vitamin A creams. I have no doubt that increasing your intake of natural vitamin A would be much better - Mother Nature really does know best. 

Increasing our regular intake of antioxidant phytonutrients can decrease our oxidative stress and lower our levels of inflammation, both of which contribute to dry, aging skin and wrinkles.This is but one of many juicing recipes that can be easy and very inexpensive to do. There are many other health benefits beyond healthy skin, but usually the health of our bodies is directly reflected in the healthy appearance of our skin.

Thanks for listening!


1.  Source: Heinricha U, Tronniera H, Stahlb W, Béjotc M, Maurettec JM. Antioxidant Supplements Improve Parameters Related to Skin Structure in Humans. Skin Pharmacology and Physiology. 2006;19:224-231.

2.  http://www.webmd.com/skin-problems-and-treatments/features/skin-nutrition?page=2


Organic is not just a buzz word

By Healthy Planet Blog Nutrition and Natural Health
on July 25, 2011

It's very satisfying to me and rewarding that more and more people are discovering the benefits of buying products that are organic. I recently wrote a post about skin health and the debate about whether and to what degree chemicals are absorbed into your skin - see here. In that article I also talked about why we use certified organic ingredients, but also that our company is not a certified organic company, so we can't use the USDA certified organic label or the label of any 3rd part certifier on the front of our labels - and we don't. We can say, however, that our products "contain certified organic ingredients and we can say at what percentage they are in a particular product. What that means is, although our products would meet and surpass the requirements for being certified organic, we hadn't taken that step yet. 

EYE CANDY:

Unfortunately, there are companies out there - and usually some of the larger big box companies - who use the words certified organic ingredients just as eye candy. We don't do that! We are proud of our ingredients and hope that you will take time to look at the long list of organic ingredients included in all of our products.

WHY DO WE USE ORGANIC INGREDIENTS?

Well, if the ingredients are NOT used just for marketing purposes - and considering they are usually 2 to 3 times more expensive than non-organic products, then why do we? We decided from the beginning that we wanted clean and effective ingredients. We wanted products that we were assured would not contain any pesticides, additional hormones, insecticides or residue left from pests in large warehouses. We also discovered that unrefined certified organics when compared to their non-organic look alikes do not "look alike". 

We, ourselves, try to eat as organically as possible and are finding that it's not that expensive, unless you are looking for grass fed, pastured meat (doesn't have to be certified organic if you know where it comes from). I've noticed that more and more people are beginning to see why that is so important. I've attached the link to a recent survey that shows many and many more people are asking for organic products. It's an "organic poll" taken from 3,000 people asking what their preference is. It's a short article, but a good one I think that shows the tide is turning more and more to organic. Click on the "check out this link" below.


wingsets check out this link logo 


Thanks for listening!


Artichoke and Bean Medly

By Recipes for a Healthier You Vegan Main Meals
on March 22, 2011

Artichoke and Bean Medley - Vegan

Below is a recipe that we've adapted from one we received from AICR (American Institute for Cancer Research). You can actually make this as a cold salad or a warm main dish. For more information on how VERY HEALTHY artichokes are, see our blog on The Mighty Artichoke, including cancer prevention benefits. 


RECIPE:

  • 1 cup of sweet onions (use green onions if making into a salad)
  • 1/2 cup of red bell pepper (chopped)
  • 1/2 cup sliced celery
  • 2 cloves of fresh garlic, minced
  • Large can of Italian tomatoes (chopped)
  • 1/2 cup of black beans (soaked overnight and cooked prior to using)
  • 1/2 cup of red kidney beans (soaked overnight and cooked prior to using)
  • 1 cup of canned green beans
  • 1 cup of red lentils (cooked - cooled if using as a salad)
  • 2 cans of artichoke hearts, drained and chopped into quarters
  • 1 tbsp olive oil 

Saute onions, celery and bell pepper until transparent in the olive oil.

Add minced garlic and continue to saute for a few minutes - don't burn the garlic (you'll be sorry.)

Combine the canned tomatoes (actually fresh would be really good here if they are available, just add fennel, oregano and thyme or your favorite Italian seasoning), the beans, and lentils with the onions, garlic and pepper.

Simmer on medium heat for about 5 to 10 minutes. Add the artichoke hearts, drained, and simmer for an additional 3 to 4 minutes. You can season with salt according to taste.

Serve in attractive casserole dish - I know you have one.

Artichokes already have a good deal of fiber and protein, by adding the beans and lentils we have greatly increased both the fiber and protein content.

Enjoy! Let us know if you try this, if you tweak it or what you think about it.


Ann


Cart Summary

Your cart is empty

Blissful Baby

  • Blissful Babies Boo Boo Bottom Balm - 99% certified organic ingredients
    Blissful Babies Boo Boo Bottom Balm - 99% certified organic ingredients
  • Blissful Babies Calendula & Chamomile Organic Bar Soap
    organic baby soap infused with certified organic calendula, chamomile and helichrysum flowers with certified organic oils and shea butter
    Blissful Babies Calendula & Chamomile Organic Bar Soap
  • Blissful Babies Lavender & Chamomile Organic Bar Soap
    organic shea butter  bar soap infused with organic lavender and chamomile essential oils and flower powder
    organic shea butter bar soap with organic essential oil of Bulgarian lavender and Roman chamomile, infused with certified organic lavender flowers and certified organic chamomile flowers, handmade, cold processed, all natural
  • Blissful Babies Lavender and Chamomile Body Cream
    organic baby cream with essential oils of true Bulgarian lavender and roman chamomile
  • Blissful Babies Lavender Body Cream
    true high altitude Bulgarian lavender in an organic body cream for babies
  • Blissful Babies Lavender Body Powder
    Blissful Babies Lavender Body Powder
    Blissful Babies Lavender Body Powder

Gluten-Free Products Clearly Identified

With an alarming increase in gluten intolerance and allergies, we feel identifying this on our skin and body products is important. If you are in...

Read more →

From the Blog

Simple Habits to Protect Your Eyesight

September 04, 2017

DID YOU KNOW?! "Orange (as in carrots) isn’t the only color that helps support the eyes; eating a variety of...

Read more →

10 BEST CANCER KILLING PHYTONUTRIENTS

September 04, 2017

DID YOU KNOW!?  You will often see me mention cancer "cures" - yes, it can be cured and you certainly...

Read more →

GINGER FOR MIGRAINES!

September 04, 2017

DID YOU  KNOW!?  Ginger as Effective as Synthetic Drug in Migraine, but Without the Side Effects! I love ginger, both...

Read more →